How to Hang a Picture Perfectly: Everything You Need to Know
Decorate your walls with confidence.
Pictures and wall art serve as beautiful home decor, capturing memories and adding an element of style to any space. Whether you plan to hang a collection of prints or one statement piece, we've got you covered. In this guide, we outline how to hang a picture regardless of your wall type or your DIY expertise.
Project Overview
- Time: 30 minutes – 1 hour
- Skill Level: Beginner
- Number of People Recommended: 1–2
What You’ll Need:
- Stepladder
- Measuring tape
- Pencil
- Painter’s tape
- Level
- Stud finder (optional)
- Power drill or screwdriver
- Mounting hardware
- Frame or wall art
Step 1: Identify the Mounting Hardware
(Shop this image: light wood sideboards, gold picture frames, farmhouse table lamps, and wrapped canvas wall art)
Picture frames and hard-backed artwork may include pre-installed D-rings, keyhole hangers, or one or two sawtooth hangers. Check the back to confirm what’s included and if additional hardware is needed. If you need to add your own hardware, here’s what we recommend:
- Small frames: one sawtooth hanger, centered
- Frames over 12" wide: two sawtooth hangers, keyhole hangers, or D-rings
- Frames over 24" wide: three hangers or two french cleats
- Canvas Art: hang on a nail or screw or attach adhesive strips (read How to Hang Canvas Art to learn more)
If you’re a renter or prefer not to put holes in your walls, consider other mounting options like adhesive strips. For brick walls, brick clips snap into place along the upper and lower edge of a brick and provide built-in hanger hooks for your artwork.
Step 2: Determine Proper Hanging Height & Placement
It’s important to have a vision for your wall art before you begin the hanging process. Below, we’ve narrowed down some popular placement options and measurement tips.
At Eye Level
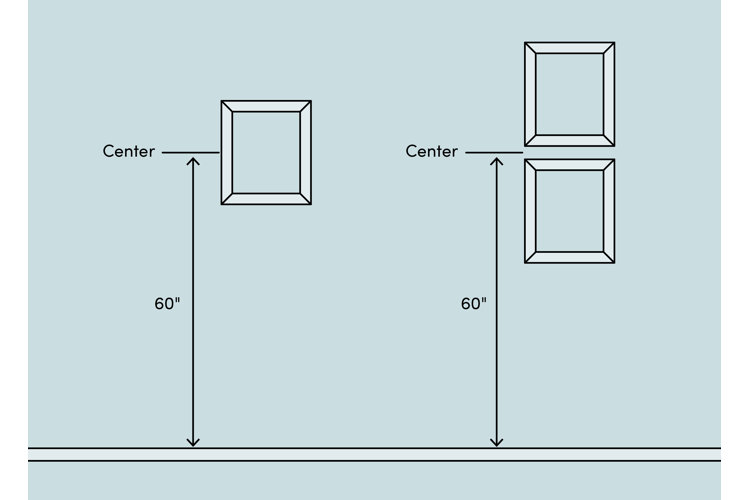
When determining frame height, a good rule of thumb is to hang them at eye level. For reference, the average person’s line of sight is 60" above the ground, so this is where you want the center of your picture or art display to sit.
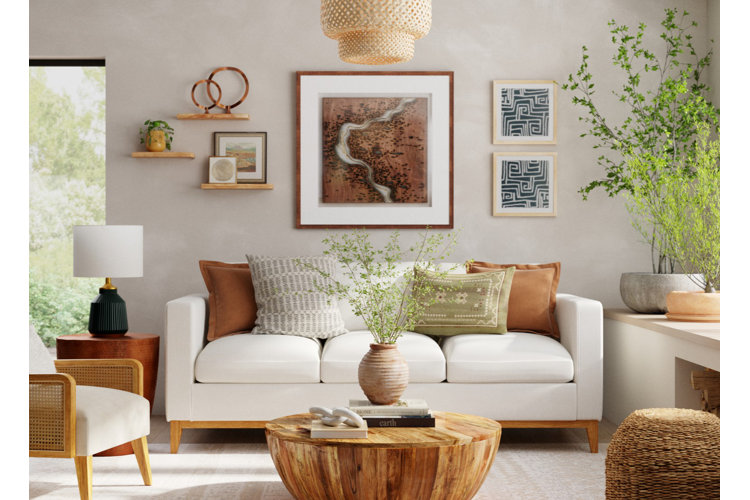
Above a Sofa
To hang a frame about your sofa, leave at least 6" – 8" of space between the top of the sofa and the bottom of the picture for best results. Choose a piece that is no more than two-thirds the length of your sofa for a proportional layout.
Tip!
Review our Wall Art Size & Placement Guide for more information to help you find the right artwork.
Above a Fireplace
The proper height to hang a picture above a fireplace mantel is 6" – 12". This allows room for mantel decor and protects the artwork from direct heat. Choose pictures or art prints that are the same width as your fireplace opening or fireplace mantel for a balanced look.
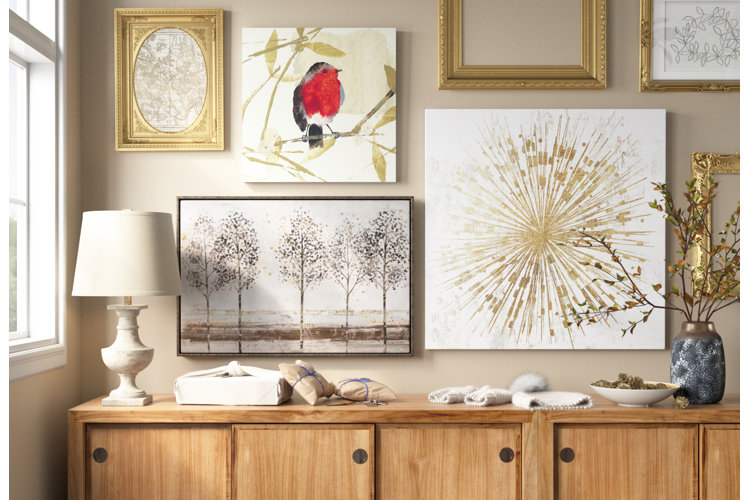
In a Gallery
Gallery walls allow for more creativity in your placement. Create a uniform look with pictures of the same size placed equidistant from each other. Or opt for something dimensional by placing pictures of different sizes together. No matter the layout of your design, aim to keep 2" of space between each piece of art, with the center of the display at about 60" high.
Tip!
For a more in-depth guide to creating a gallery wall art display, read How to Make a Gallery Wall to learn more about creating the ultimate gallery wall.
(Shop this image: white accent chairs, jute ottomans, glam abstract wall art, and white area rugs)
Using your roll of painter’s tape, mark the positions of the mounting brackets on the back of the picture frame. For frames with pairs of D-rings, sawtooth hangers, or keyhole hangers, stretch the tape across the frame and mark both brackets on the tape. For those with single mounts, stretch the tape across the whole frame and mark the center of the mount.
Then transfer the painters tape to the wall so you can visualize the frame placement. This is a foolproof method to guarantee that you drill holes in the correct spots on the wall that match up with your frame’s brackets.
(Shop this image: leather desk chairs, industrial wall art, abstract area rugs, metal-base desks, and leaning bookcases)
The process of installing wall art will vary depending on the type of wall you have. Follow these steps depending on the surface you’re working with:
Drywall & Plaster Walls
Drywall contains vertical studs, while plaster walls have horizontal laths attached to studs – both providing strong anchor points for hanging art and decor. To find them, use a stud finder and mark their locations before installing your hardware.
If your hanging spot aligns with a stud or lath, start by drilling pilot holes. Insert a hanger screw, leaving it slightly protruded so you can attach picture wires or mounting hardware. For French cleats, mark the pre-drilled holes, drill into the studs, and secure the cleat with screws.
If no studs are available, you'll need to use hollow anchor screws or toggle bolts (or molly bolts for plaster walls) for additional support. Start by drilling a pilot hole in your desired location. For drywall, insert a toggle bolt or a hollow anchor screw, and use your power drill to drill it firmly into place. Then use your power drill to drill a hanger screw into the center of the toggle bolt/hollow anchor screw in the hole. For plaster walls, insert a molly bolt into the pilot hole and use a hammer to lightly tap it into place. Drill the molly bolt to secure and then drill the hanger screw into the molly bolt.
Brick Walls
Working with brick walls will require additional tools including a hammer drill, masonry bit, anchor, and screw. For brick walls, it’s best to drill into the mortar rather than the brick itself to prevent cracks. Use a hammer drill with a masonry bit to create pilot holes in the mortar. Next, tap a masonry anchor into the hole with a hammer and secure a masonry screw inside it, leaving enough space for hanging your picture.
Step 5: Check for Levelness
(Shop this image: round wall mirrors, abstract wall art, white sofas, and jute area rugs)
The final step in hanging your part or picture frames is to check for levelness. Hang the frames on the mounts and use your level to ensure they are hanging properly. Now, step back and enjoy your new wall display!
