How to Remove a Shower Drain
Everything to know about shower drain removal.

It's important to have a functional and stylish shower drain so you can maximize your shower experience, ensure proper water drainage, and prevent pipe blockages. If you're considering this DIY project, you'll be happy to know that removing a shower drain is much easier and more beginner-friendly than you might think. In this guide, we go over how to remove a shower drain and install a new one that matches your style.
Before You Begin
Here's an overview of what to expect when removing or replacing a shower drain, including time requirements, skill level, helper needs, and a general supply list.
Time: 1–2 Hours
Skill Level: Beginner
Number of People Recommended: 1
What You'll Need:
- A cross-head screwdriver (to remove drain cover screws) and/or a pair of flathead screwdrivers (to help remove remaining drain components or to remove a tile-in drain cover)
- A lifting hook and/or two pairs of nose pliers (to lift/twist off the drain cover)
- Drain lubricant (if necessary to help loosen the stuck drain pieces)
- Cleaning rags and gloves (for cleaning the strainer and drain opening)
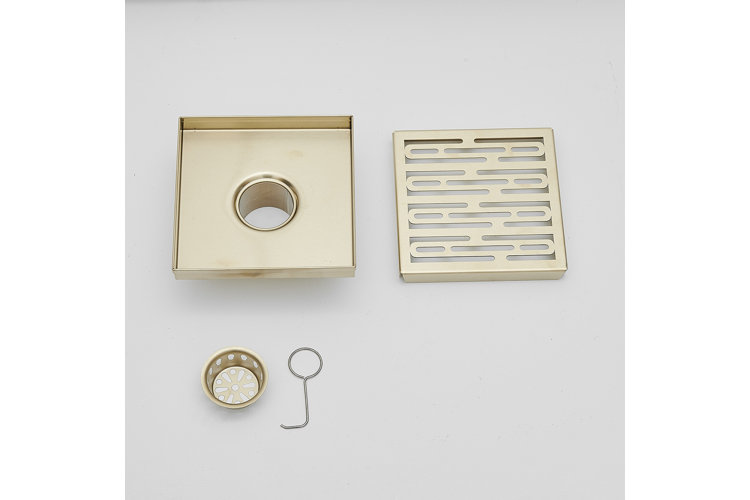
- A shower drain kit that (depending on the manufacturer) includes a shower drain cover, hair strainer, drain body and coiled drain flange (sometimes pre-attached to the bottom of the drain body), and a drain thread adapter if the drain body's flange is too small to fit snugly in the drain hole. The drain flange is a cylindrical shaped piece of metal that's open on both ends and coiled on the outside.
- A rubber shower drain gasket (usually fits snugly between the underside of the drain body and the thread adapter or the drain hole opening)
- Plumber's putty or another sealant recommended by the product's manufacturer
The first step in how to remove a shower drain is to figure out what type of shower drain you currently have. This will impact the removal process and help when choosing a new shower drain. Shower drains typically come in either round or square grids, linear grids, or tile-in configurations. We go over each of these in our guide on Types of Shower Drains & How They Work. Standard grid and linear grid drains have similar removal processes, while tile-in drains require a bit more finesse to prevent damage to surrounding tiles.
Tip!
Do you have a shower/bathtub combo? You might have a lift-and-turn or pop-up drain, Reference How to Replace a Tub Drain: Your Step-by-Step Guide for specific instructions on how to remove a shower drain stopper.
2. Remove the Cover Screws (If Applicable)
Some shower drain covers have screws that need to be removed before you can dislodge the drain cover. This can usually be done using a cross-head screwdriver. For tile-in drain covers, you'll simply need a pair of flathead screwdrivers to carefully lift the sides of the drain cover off of the drain body.
3. Try the Lift Hook Method
If your drain cover doesn't have screws, or after you've removed them, you can try raising the drain cover with a lift hook. These shower drain removal tools usually come with drain kits or can be purchased separately. Place the metal hook in one of the cover grates and gently pull upwards using your fingers. You should be able to remove it the rest of the way with your hands once the cover starts to loosen.
4. Use Pliers for Snug Drain Covers
If your drain cover cannot be lifted with a lift hook, don't worry! Attach a pair of nose pliers to a couple sets of grate holes. Then, slowly twist/pull on the drain cover using the pliers. If this method for how to take off a shower drain doesn't work, apply a drain lubricant around the edges of the drain cover and let it rest for 15 minutes before trying again.
5. Clean the Drain Body & the Strainer
Once the drain cover is removed, you should be able to see the inside of the drain body and the hair strainer. The hair strainer either rests directly on top of the drain body or fits into the drain body's central drainage hole. Put on some rubber gloves and remove the hair strainer. Then use a cleaning rag to wipe down the surface of the drain body and the inside of the drain hole. You may also want to use a bathroom cleaning solution designed to remove grime and prevent rust. This is an important step even if you plan on replacing the drain, because it allows you to see all of the components and creates a mess-free removal.
Tip!
Our guide on How to Fix a Shower Drain goes over more methods for how to remove hair from a shower drain and other helpful cleaning tips.
6. Remove the Drain Body
The next step in how to remove a shower drain is to remove the drain body. This is either a square, round, or narrow rectangular metal plate that rests in or on top of the shower tiles/shower base. Some drain body components have grooves located on the sides around where the hair strainer goes. You can use a flathead screwdriver or a flathead screwdriver/drain key combo to latch onto the grooves and turn to loosen the drain body from the hole. In some cases, you may need to spray a drain lubricant on and around the drain body (including down the drain) and leave it for 15–20 minutes to make it easier to loosen the drain body and free it from any remaining sealants keeping it in place.
Once the drain body is removed, you'll want to clean the drain opening and inside the drain hole with a rag and a grime-fighting cleaning solution. Then, dry the spot. This will guarantee a strong seal when you install the new drain.
Tip!
If you're removing a shower drain with a tile-in design, you can use a mini hacksaw to carefully cut the sides of the drain body. Then, use pliers to help dislodge it without disturbing the surrounding tiles.
7. Measure for the New Shower Drain
We recommend measuring the length and width of the old drain body to determine the proper size to fit snugly in between tiling or the hole already created in the shower base. Most shower drains are designed to fit in standard drain holes, with thread adapters available if the drain flange is too small to fit snugly into the drain hole. However, it's always a good idea to measure the diameter of the drain hole opening to determine the maximum diameter of a drain flange to look for when shopping for a new shower drain kit.
8. Install the New Shower Drain
Once you know how to remove a shower drain, installing a new one is a breeze! Here's how to install a shower drain, step-by-step:
- Start by testing how the coiled drain flange (usually attached to the bottom of the drain body) fits into the drain hole opening. If it's too loose – even when you try to twist/tighten it, you'll want to attach a threaded adapter to the bottom of the flange to ensure a watertight seal.
- Place a rubber gasket on the inside of the drain hole – it should fit around the opening.
- Roll out the plumber's putty and wrap it around the underside of the drain body.
- Lower the assembled flange/drain body into the drain hole and twist/press down until the drain body is snug against the shower base/tiles.
- Remove excess putty from around the edges of the drain body.
- Place the hair strainer inside of the drain body.
- Lower the drain cover on top of the drain body and attach any mounting screws to the cover.
9. Test It Out
Once you've either cleaned or replaced your shower drain, run the shower to test how it works and give yourself a pat on the back!
You Might Also Like
Start shopping for a shower drain replacement.
