Table Setting Diagram: Basic, Casual & Formal Place Settings
The proper place setting diagram that will make you look like a pro.
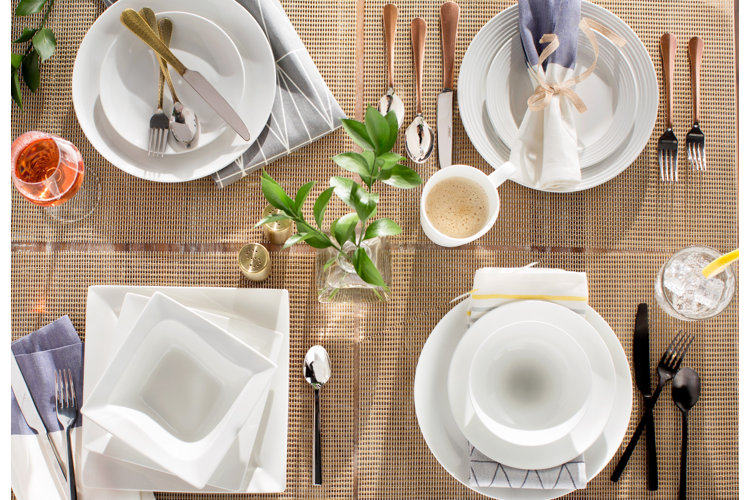
Knowing how to set a dining table properly is a timeless skill that instantly elevates any meal, from casual dinner parties to formal holiday feasts. Navigating the rules of proper place settings can feel intimidating, but creating a beautiful, functional table arrangement is simpler than it seems. Read on for labeled table setting diagrams, step-by-step instructions, and expert etiquette tips to help you arrange a proper place setting for any occasion.
Basic Place Setting
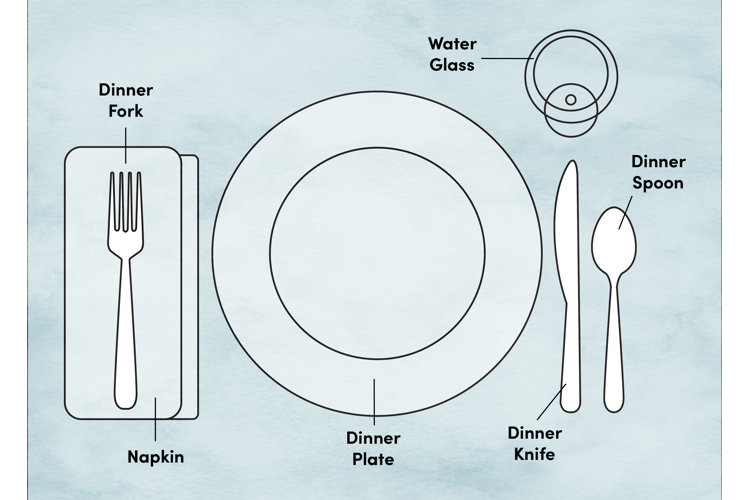
Setting a table doesn’t have to be elaborate. This basic place setting is perfect for a small, informal meal with friends or family.
What You Need for a Basic Table Setting
To arrange a basic table setting, you'll need just a few everyday essential pieces:
- Placemat or Charger Plate (Optional): Acts as a grounding base for your arrangement.
- Dinner Plate: Placed directly in the center of the seat setting.
- Dinner Fork: Positioned to the left of the dinner plate.
- Dinner Knife: Placed to the right of the plate, with the cutting edge facing inward toward the plate.
- Teaspoon or Soup Spoon: Placed to the right of the knife.
- Water Glass: Placed just above the dinner knife.
- Cloth or Paper Napkin: Positioned to the left of the fork or directly on top of the dinner plate.
Step-By-Step: How to Set a Basic Table
Follow these simple steps to prepare your table for a casual meal:
1. Lay the Foundation: Place a placemat on the table in front of each seat to define the setting.
2. Center the Plate: Set the dinner plate in the middle of the placemat.
3. Place the Napkin: Set the folded napkin to the immediate left of the plate.
4. Arrange the Fork: Lay the dinner fork directly on top of or to the left of the napkin.
5. Set the Knife: Place the dinner knife to the right of the dinner plate, ensuring the blade faces inward toward the plate.
6. Add the Spoon: Position the spoon to the right of the knife.
7. Set the Drinkware: Place the water glass at the top-right corner, directly above the tip of the knife.
Casual Place Setting
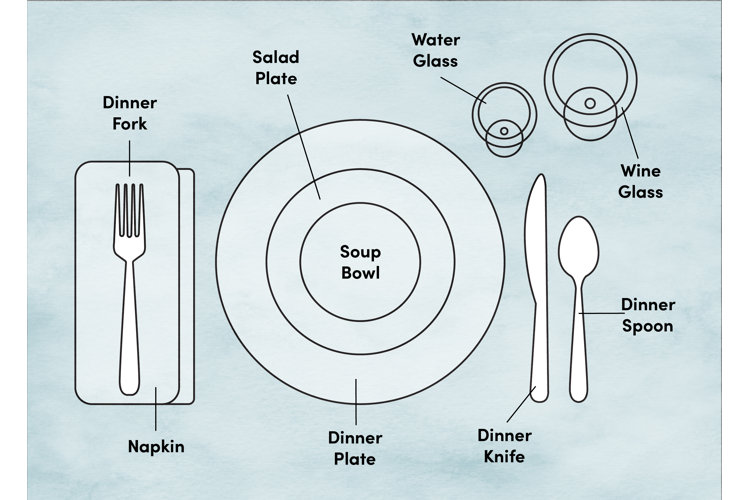
This casual table setting shows you how to properly set a table for large get-togethers with friends or meals with more than one course.
What You Need for a Casual Dinner
Hosting a multi-course dinner party or weekend gathering? Here is everything you need to arrange a casual place setting:
- Placemat or Charger Plate: Serves as the base to protect your table surface and frame each setting.
- Dinner Plate: The central plate for your main course.
- Salad Plate or Soup Bowl: Placed directly on top of the dinner plate for your starter course.
- Dinner Fork: Positioned to the left of the dinner plate.
- Salad Fork: Positioned to the far left of the dinner fork if serving a salad course.
- Dinner Knife: Set to the right of the plate, with the cutting blade facing inward.
- Soup Spoon or Teaspoon: Placed to the right of the dinner knife.
- Water Glass: Placed directly above the dinner knife.
- Wine Glass: Set to the right of the water glass (for white or red wine).
- Cloth Napkin: Folded neatly and placed to the left of the forks or centered on top of the starter plate.
Step-by-Step: How to Set a Casual Table
Setting a semi-formal or casual table is all about arranging your tableware in the order your guests will use it. Follow these step-by-step instructions:
1. Set the Foundation: Lay a placemat at each seat setting.
2. Center the Dinner Plate: Place your main dinner plate squarely in the middle of the placemat.
3. Stack Starter Dishes: Set the salad plate or soup bowl directly on top of the dinner plate.
4. Arrange the Forks: Lay the dinner fork to the left of the plate. If serving a salad first, place the smaller salad fork to the far left of the dinner fork, following the "outside-in" utensil rule.
5. Set the Knife and Spoon: Place the dinner knife to the immediate right of the plate (blade facing in). Set the soup spoon or teaspoon to the right of the knife.
6. Position the Napkin: Set a neatly folded cloth napkin to the left of your forks, or center it beneath the soup bowl.
7. Add the Drinkware: Set your water glass at the top-right corner above the knife, then place your wine glass slightly to the right and just below the water glass.
If you’re hosting an elegant dinner with a three- or four-course meal, follow fine-dining etiquette guidelines to learn how to set a formal table.
What You Need for a Formal Dinner
A formal place setting requires a full ensemble of dinnerware, flatware, and glassware designed for multiple courses:
- Tablecloth & Centerpiece: Sets an elegant, formal tone.
- Charger Plate: A decorative base plate that remains at the setting for the first two courses until the main entrée is served.
- Soup Bowl & Salad Plate: Multi-course dishes stacked on top of the charger plate.
- Dinner Plate: Replaces the starter dishes and charger plate for the main course.
- Bread & Butter Plate & Knife: Placed at the top-left corner above the forks, with the butter knife resting diagonally or horizontally across the plate.
- Formal Flatware: Includes a salad fork, dinner fork, dinner knife, soup spoon, teaspoon, and optional seafood/oyster fork.
- Dessert Spoon & Dessert Fork: Laid horizontally above the main dinner plate.
- Formal Glassware: Water glass, red wine glass, white wine glass, and champagne flute.
Step-by-Step: How to Set a Formal Table
Arranging a formal table requires strict adherence to outside-in utensil rules and exact glass placement. Follow these steps to set a flawless formal table:
1. Place the Charger: Set a charger plate in the precise center of each seat, about one inch from the table edge.
2. Stack Starter Dishes: Stack the soup bowl or salad plate on top of the charger plate.
3. Set Left-Side Flatware (Forks): Place the dinner fork closest to the left side of the charger plate. Set the salad fork to the left of the dinner fork (unless salad is served after the entrée, in which case the salad fork moves to the immediate right of the dinner fork).
4. Set Right-Side Flatware (Knives & Spoons): Place the dinner knife directly to the right of the charger plate with the cutting blade facing inward. Lay the soup spoon or teaspoon to the right of the knife. If serving a seafood course, place the small seafood fork to the far right of the spoon.
5. Arrange Bread & Butter Plates: Position a bread and butter plate at the top-left corner, directly above the forks. Lay a small butter knife diagonally or horizontally across the plate.
6. Set Dessert Utensils: Place the dessert spoon and fork horizontally above the charger plate. The dessert spoon sits on top with its handle facing right; the dessert fork sits underneath with its handle facing left.
7. Position the Glassware: Set the water glass approximately one inch directly above the tip of the dinner knife. Arrange red and white wine glasses to the right and slightly below the water glass. If offering a champagne toast, set the champagne flute to the far right of the wine glasses.
8. Add Napkins & Finishing Touches: Fold a cloth napkin neatly and place it on top of the starter dish or to the left of the forks.
Neighborly Tip!
When coordinating formal table linens, ensure you select the appropriate dimensions to achieve a classic formal drop. For more help with table coverage, check out our guide on how to select the correct tablecloth size.
Etiquette & Tips
Setting a table properly goes beyond placing utensils in their designated spots – it also creates an effortless, enjoyable dining experience for your guests. Here are essential hosting etiquette guidelines to keep in mind:
Spacing & Utensil Alignment
- Border Line: Line up the bottom edges of all flatware evenly with the rim of the dinner plate, roughly 1 inch from the table's edge.
- Elbow Room: Allow at least 15 inches of space between place settings so guests can dine comfortably without feeling crowded.
Pre-Dinner Prep
- Beverages & Butter: For formal gatherings, water glasses should be filled and wine ready to serve before guests sit down. Individual butter pats or pats served on a butter dish should also be placed on the bread and butter plates prior to seating.
- Clearing the Table: Before serving the dessert course, clear all previous course dishes, flatware, salt and pepper shakers, and condiment dishes from the table.
Resting & Finished Utensil Positions
- Taking a Pause: When taking a break from eating, lay your fork and knife diagonally across the middle of the plate so they cross in an "X" shape.
- Finished Eating: When finished with a course, place your fork and knife parallel to each other at the 4 o'clock position on the plate. This signals to the host or server that your plate is ready to be cleared.
Utensil Placement Rules (Outside-In)
Understanding utensil placement is simple once you master the classic "outside-in" rule: flatware is arranged on the table in the exact order it will be used throughout the meal, moving from the outermost utensils inward toward the plate.
- Forks on the Left: All forks sit to the left of the dinner plate. The salad fork is placed on the far outside left for the starter course, while the main dinner fork rests closest to the plate. (Note: If salad is served after the main entrée, the salad fork moves to the immediate right of the dinner fork.)
- Knives & Spoons on the Right: Knives and spoons are placed to the right of the plate. The dinner knife rests closest to the plate with its blade facing inward, followed by the soup spoon or teaspoon to its right. If serving a formal seafood course, a small oyster or seafood fork is placed to the far right of the spoons – making it the only fork placed on the right side of the plate.
- Dessert Utensils Above the Plate: Dessert flatware sits horizontally directly above the dinner plate. The dessert spoon rests at the top with its handle pointing to the right, and the dessert fork lays directly beneath it with its handle pointing to the left.
Glassware Placement
All drinkware is arranged at the top-right corner of the place setting, positioned at roughly a 45-degree angle above the tip of the dinner knife:
- Water Glass: Positioned directly above the dinner knife as the anchor piece.
- Wine Glasses: Placed to the right and slightly below the water glass. In a formal multi-glass setup, the white wine glass sits closest to the guest, while the larger red wine glass sits above and to the right of the white wine glass.
- Champagne Flute: Placed to the far top-right, just beyond or behind the wine glasses.
Napkin Placement
Proper napkin placement depends on the formal level of your event and the physical space at your table:
- Basic & Casual Settings: Fold the napkin neatly and place it to the immediate left of the forks, or center it on top of the dinner plate.
- Formal Settings: Place the napkin centered on top of the charger plate or starter bowl, or to the left of the forks.
- Tight Table Spaces: If your dining table space is tight, flatware can be laid directly on top of a neatly folded napkin to save room.
Frequently Asked Questions
Which side does the napkin go on?
For basic and casual place settings, place the folded napkin to the left of the forks or on top of the dinner plate. In a formal setting, it can be centered on the charger plate or starter dish, or placed to the left of the forks.
What is the correct order of silverware?
Arrange silverware in the order it will be used, working from the outside in. Forks go to the left of the plate, while knives and spoons go to the right, with the dinner knife closest to the plate and its blade facing inward.
Where does the bread plate go?
The bread and butter plate belongs at the top-left of the place setting, above the forks. Place the butter knife diagonally or horizontally across the bread plate.
What is a charger plate?
A charger plate is a decorative base plate used for formal dining. It sits beneath the soup bowl or salad plate during the first courses and is removed before the main entrée is served.
