Pickling and Canning for Beginners
Ever wanted to try pickling and canning? Check out this beginner's guide with two great recipes!
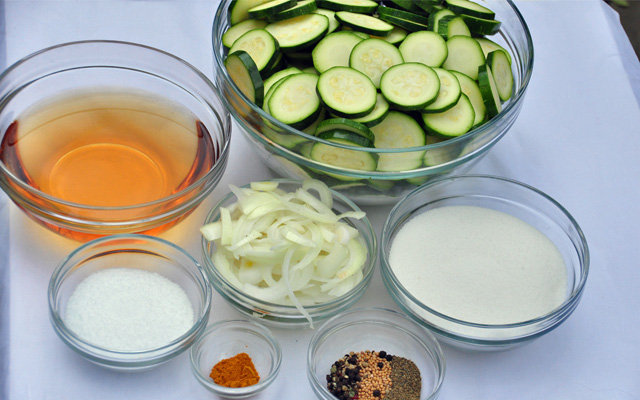
Photo: Anna Fassnacht
Pickling and canning is easier than you think!
You can do most of it with the pots and pans in your kitchen. And it's even easier than jam because you don't have to worry about whether or not your pickles are going to set correctly.
This guide will tell you everything you need to know about making and storing pickles.
Tools
To make preserves and pickles you are going to need a few specialized tools and a few everyday tools that are probably already in your kitchen.
- Large 8-12 quart stock pot (to sterilize your jars before you fill them)
- Ladle
- Tongs
- Wide-mouthed quart jars (or pint jars with lids)
- Canning funnel
- Jar lifter
- Canning ruler
- Boiling water canner (optional): Stock pots can be too small to hold enough water when the jars are added, so I like to have a large water bath canner when I'm making many jars. It holds a lot of water without boiling over, has an insert that makes raising and lowering the jars easy, and it protects the jars from rattling on the bottom of the pot and potentially breaking.
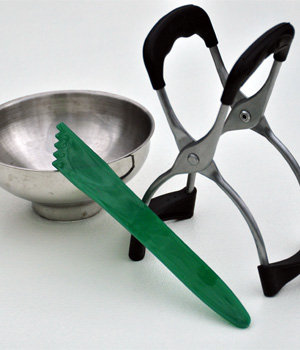
Photo: Anne Fassnacht
Tip!
An important thing to consider is if your stove can handle the weight of a large pot filled with water and filled jars. Many new ceramic stove don't recommend using them for canning because the weight could crack the top. Check your owners manual to be sure. If you can't use your stove you can use a portable camp stove for the canning process.
Prepping the Jars
One of the most important steps in canning is making sure your jars are sanitized before you fill them. To sterilize, run them through the dishwasher or bring a pot of water to a boil, then reduce to a simmer, and leave the jars in the water for at least 5 minutes.
In a small pan, heat some water to a simmer and place the lids and bands in there until you are ready to use them.
Ingredients
As a beginner, it is important to follow the recipe. They are written a specific way for a variety of reasons, with the primary reason being the safety of anyone that eats them. You can change the flavor, but leaving the acid quantity as is will make sure you get the results you want and ensure your product will be safe to eat.* Produce :
- The produce should be good quality—the ripest, tastiest produce you can get your hands on. Don't use overly ripe or bruised produce for pickles because it can cause bacteria to grow in your finished product. While you can certainly preserve the large quantities you buy at the store, you will get better flavor if you get them at a local farm.
- Salt :
- Most recipes call for pickling salt, which is easy to find. Your regular table salt isn't a proper replacement. Table salt has iodine added to it; the iodine will make the brine for the pickles look cloudy. While it will still taste good, it won't be pretty.
- You can substitute kosher salt for pickling salt. The main difference between pickling salt and kosher salt are the shape of granules and the addition of a caking agent in kosher salt. Caking agents, unlike iodine, don't cause cloudy brines. However, because of difference in granule size, one tablespoon of pickling salt does not equal one tablespoon of kosher salt and vice versa. If you're substituting, search the internet for a conversion chart. But if you're going to make a lot of pickles, it's easier to just pick up an inexpensive box of pickling salt.
- Acid:
- Whether you're making jams, jellies, or canning vegetables, acid is the most important ingredient to ensure food safety. Acid's most important role is to create an environment unsuitable for bacteria. Because of this, you do not want to change the amount of acid called for in a recipe.
- In preserves and pickling, the acid used is typically vinegar. Make sure your vinegar has the right percentage of acid. The distilled white and cider vinegar at the store will note the percentage on the front of the container. You want it to be 5% acidity, which is the level of most vinegar at the store.
- Using fancy flavored or homemade vinegar aren't recommended when making shelf-stable pickled foods because the acid level can vary. If you don't have 5%, some bacteria may be able to survive in a sealed jar.
- Spices and Seasoning:
- Pickling spice is one of the main ingredients you'll come across in pickle recipes. You can make your own or purchase a blend from a grocery or specialty spice store. Likely ingredients include bay leaves, peppercorns, allspice, coriander, mustard, juniper berries, cloves, dill, and cinnamon.
- As you make and eat more pickles, play around with the seasoning and spices to get your perfect pickle.
Tip!
Bread and butter are a popular pickle that contains neither bread nor butter! They get their yellow color from the turmeric that is added to the brine.
Processing the Jars
Fill the Jars
Remove your jars from the pot of hot water you've been storing them in. If you are using the same pot to process your jars, turn the water back up to a boil and check that you have enough water in the pot to cover the jars by two inches. If you are using a water bath canner, turn up the water to a boil.
Fill the jars using a canning funnel that fits nicely in the jars. Using your canning ruler, measure to make sure you have the appropriate headspace. (The headspace is the space between the top of the liquid and the jar.) Each recipe will mention the headspace you need to leave. It is important to have to correct amount of space to allow for expansion of your product and to create the vacuum needed to seal the jar.
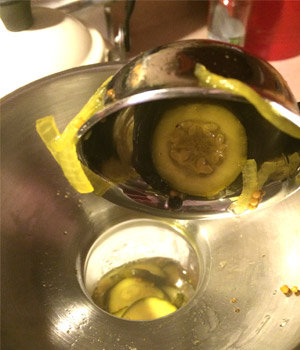
Wipe the top rim and the edges of the jar with a clean towel. Also wipe down the lid of the jar with a damp towel. This will allow the lid to form a tight seal and make sure no air can get in while the finished jars are stored. Once it is clean, put the lid on and screw on the bands.
Seal the Jars
Now you are ready to seal your jars. Your pot of water should be at a boil. Using your jar lifter, set your jars in the boiling water. You may need to remove some water from the pot as you do this (use a ladle or measuring cup). When the water comes back to a boil, start timing the process. This could take anywhere from 5-20 minutes depending on the recipe.
Remove your jars carefully with the jar lifter, and place them on a towel-covered area of the counter. You will begin hearing popping sounds as the jars seal. Congratulations, you have successfully canned! The lid will become concave after 24 hours. You can test the seal by removing the band and holding the jar by the lid just a few inches off the counter. If it stays tight you have a quality seal. If one or two don't seal just put them in the fridge and enjoy within two weeks.
If you follow the recipes, canning is a fun and rewarding process. Get your kids involved picking or preparing the veggies and you can start a family tradition of canning that will last generations.
Bread and Butter Zucchini Pickles
Photo: Anne Fassnacht
3 1/2 pounds zucchini, cut into 1/4 inch slices
1 cup thinly sliced onion
6 tablespoons kosher salt
2 cups cider vinegar
1 1/2 cups sugar
1 tablespoon yellow mustard seed
1 tablespoon celery seed
3/4 teaspoon whole black peppercorns
1/2 teaspoon ground turmeric
In a large glass bowl, combine the zucchini and onion and toss with salt. Cover with saran wrap and place in the fridge for 2-4 hours.
Drain zucchini and onions.
In a non-reactive pot, combine vinegar, sugar, mustard seeds, celery seeds, peppercorns, and turmeric and bring to a boil. Stir until sugar is dissolved.
Add zucchini mixture. Bring back to a boil. Reduce heat to a simmer and stir frequently. Cook uncovered for approximately 5 minutes.
Ladle hot mixture into warm, sterilized pint jars. Leave a 1/2 inch headspace. Wipe down tops of jars and top with lids. Screw on bands
Process filled jars in a water bath canner for 10 minutes. Remove jars and cool.
Pickled Jalapeños
Photo: Anne Fassnacht
1 pound jalapeño peppers, sliced in 1/4 inch rings
2 cups white vinegar (5% acidity)
2 cups water (preferably filtered or bottled)
4 tablespoons kosher salt
1 tablespoon honey
In a medium saucepan, add vinegar, water, salt, and honey and place over medium heat. Bring to a boil, reduce to a simmer and stir making sure salt is dissolved.
Add sliced jalapeños and return to a boil for 2-3 minutes.
Fill warm, sterilized jars using a canning funnel. Leave a 1/2 inch headspace. Wipe rims of jars, top with lids and screw on bands.
Process in a water bath canner for 5 minutes. Remove jars and cool for 12-24 hours.
