Your Guide to Replacing Cabinet Hinges
Follow these steps to update your cabinet hinges.
Replacing cabinet hinges is a project that is well within the abilities of most handy do-it-yourselfers. This article will provide you with clear step-by-step instructions on how to replace hinges, to help make your cabinet project easier. Before beginning, it is important to identify what type of hinges you need. To learn more about the types of hinges, read Your Guide to the Types of Cabinet Hinges before starting your project.
In this guide:
When to Replace Cabinet Hinges
Replacing Cabinet Hinges
Trouble-Shooting Any Issues
Frequently Asked Questions
When to Replace Cabinet Hinges
In general, you should replace cabinet hinges if they are corroded, loose, broken, or if the door no longer closes properly. It is also a good idea to replace them if they are no longer aesthetically pleasing. Additionally, if you are replacing the cabinet doors, you should also replace the hinges to ensure a perfect fit. Finally, if you are remodeling your kitchen or bathroom, replacing your old hinges with new ones can give the room a fresh, modern look.
Before You Begin
In addition to the new hinges, you will need a few basic tools such as a Phillips screwdriver, a flat-tip screwdriver, a drill, and a set of drill bits. Be sure to use a drill bit that is slightly smaller than the original screws to ensure a good fit. We also recommend having a pencil on hand to mark where you'll be drilling. The amount of time required for the job will depend on the number of hinges you are replacing and your experience. Having the right tools, including an assistant to hold the door in place, will also help speed up the job.
Replacing Cabinet Hinges
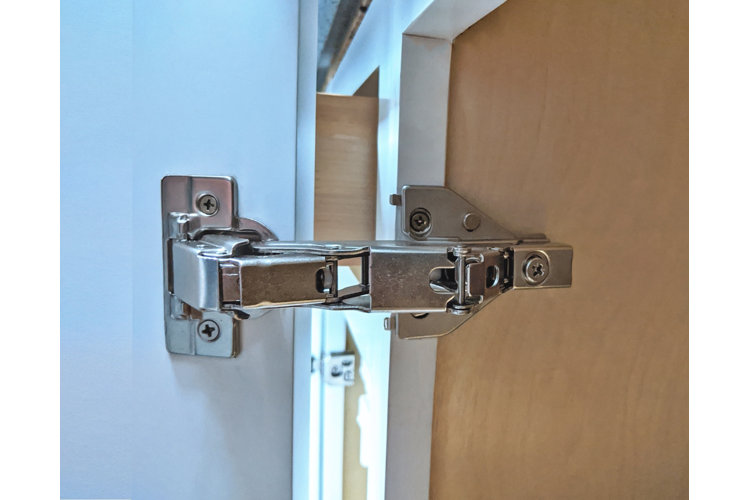
Step 1: Remove the old hinges.
The first step is to remove the old hinges. Use your Phillips screwdriver to remove the screws that secure the hinge to the cabinet frame. Once you have removed the screws, the old hinge will separate from the door and the cabinet frame.
Tip!
Measure the size of the old hinge to ensure that the new hinge is an appropriate fit.
Step 2: Put the new hinge in place on the door.
If necessary, match the holes in the new hinges with those in the old hinges. This is important to ensure that the screws align properly. If the new hinges have different screw hole locations, use a measuring tape and your pencil to mark the location for the new screw holes. Hold the hinge in place and mark where the new screw holes will be. Drill pilot holes in the door where you marked the screw holes. Fasten the hinge to the door with the screws provided. If you are using a surface-mounted hinge, simply screw the hinge to the door with the screws provided.
Tip!
The bottom of the hinge should be placed about 2 inches from the bottom edge of the door.
Step 3: Place the new hinge in the cabinet frame.
Again, if you are using a concealed hinge, you will need to drill two holes in the frame. Pilot holes should also be drilled before attaching the hinge to the frame with the screws provided. Once the hinges are in place, place the door in the cabinet frame and make sure it fits correctly. Adjust the hinges if necessary to ensure the door hangs properly. If you are using a surface-mounted hinge, you may need to use a chisel to make sure the hinge sits flush with the frame. Finally, secure the door to the frame with the screws provided.
Step 4: Check the alignment of the hinges.
Check the alignment of the new hinges by opening and closing the door. If the door does not correctly close, you may need to make adjustments to the hinges. To adjust the hinges, loosen the screws and shift the hinge as needed until it closes smoothly. Make sure to retighten the screws once the adjustment has been made.
Step 5: Repeat the process.
If you are replacing multiple hinges, repeat the process for each hinge until the job is complete.
Trouble-Shooting Any Issues

If you have trouble adjusting the hinges or the door still doesn't close properly after replacement, you may need to double-check that you used the correct type and size hinge for the door. It is important to use the correct type and size of hinge to guarantee a snug fit and proper closure. Be sure to re-measure the door frame before purchasing replacement hinges so you can get the right fit. It is also important to use the right tools for the job. An electric drill and screwdriver are recommended for easy installation. If you don't have these tools, you may be able to rent them from your local hardware store. If you have the right tools and the correct hinges, you can follow the instructions above to successfully replace the existing hinges.
Replacing cabinet hinges can be a straightforward project if you have the right tools, materials, and instructions. As long as you take your time and take care when making adjustments, you should complete the task easily and successfully. Now, check out all of the hinges we have available on Wayfair!
Frequently Asked Questions
When should I replace my cabinet hinges?
Replace cabinet hinges if they are corroded, loose, broken, or if the door doesn't close properly.
What tools do I need to replace cabinet hinges?
You'll need a Phillips screwdriver, a flat-tip screwdriver, a drill, drill bits, and a pencil.
